本篇將介紹幾個基礎的Qt物件,包括Label, Button, LineEdit, TextEdit等等,讓大家開始熟悉各個元件使用以及相關的屬性還有用法。此外,本篇將會使用QtDesigner去拉出QML語法的UI檔案,讓大家熟悉外部UI檔的使用方式。
QtDesigner簡介
再開始之前要先讓大家了解QtDisgner的介面以及重要的屬性面板,這樣可以使我們後續的開發更加快速方便。

上圖,左側的式各種圖形物件,再Qt中所有圖形物件都繼承於QtWidget這個類別,我們可以從右側的屬性欄位看到QLabel是個QFrame繼承QtWidget,最終所有Qt物件都是繼承於QtObject,從屬性欄中可以一目瞭然。
Load UI File
from PySide2.QtCore import QFile
from PySide2.QtUiTools import QUiLoader

class MainWindow(object):
    def __init__(self, parent=None):
        self._window = None

        self.setup_ui()

    @property
    def window(self):
        """The main window object"""
        return self._window
    def setup_ui(self):
        """Setup UI"""
        loader = QUiLoader()
        file = QFile('./main_window.ui')
        file.open(QFile.ReadOnly)
        self._window = loader.load(file)
        file.close()
        self.set_title()
        self.set_buttons()
        self.set_edits()
QLabel

QLabel最重要的功能就是如同Billboard一般顯示文字方塊,其最重要的屬性就是 text與 setText()用來設定Label的文字內容
另外,我們也希望設定文字的大小以及字型變化,QLable提供了 setFont() 設定方法讓我們可以設定字型。
from PySide2.QtGui
import QFont
self._window.title.setText('This is PySide2 Tutorial')
# set font
font = QFont("Arial", 20, QFont.Bold)
self._window.title.setFont(font)
也可以以QtWidget的方法來設定Label的大小,並且用Qlabel的方法設定Alignment。
from PySide2.QtCore import Qt
def set_title(self):
    self._window.title.setText('This is PySide2 Tutorial')
    # set font
    font = QFont("Arial", 20, QFont.Bold)
    self._window.title.setFont(font)
    # set widget size (x, y, width, height)
    self._window.title.setGeometry(0, 0, 600, 30)
    # set alignment
    self._window.title.setAlignment(Qt.AlignBottom | Qt.AlignCenter)

PushButton
按鈕其實非常簡單,最重要的功能就是配合Signal / Slot 來完成想要的動作。屬性上大家最好奇的大概就是讓按鈕有圖示了!這邊就教大家如何設定按鈕圖示吧!
推荐大家幾個免費的Icon下載網站:iconFinder / flatIcon
from PySide2.QtGui import QIcondef set_buttons(self):
    """Setup buttons"""
    self._window.import_btn.setText('Import')
    self._window.exit_btn.setText('Exit')

    self._window.import_btn.setIcon(QIcon('./media/import.svg'))
    self._window.import_btn.clicked.connect(self.import_item)
    self._window.exit_btn.clicked.connect(self.exit)

QLineEdit / QTextEdit
Edit顧名思義就是可以編輯輸入的區域,Line與Text的差異就在於一個是單行輸入,同時可以用於密碼輸入,而TextEdit則是可分段的文字輸入區塊。
其中最主要得方法也是 text()以及 setText(),但是TextEdit還多了一個 append()的功能。
def set_edits(self):
    """Setup line edit and text edit"""
    self._window.input_line.setPlaceholderText('Input item to import')
    self._window.output_text.setPlaceholderText('Import Item')

@QtCore.Slot()
def import_item(self):
    import_item = self._window.input_line.text()
    self._window.output_text.append(import_item)

@QtCore.Slot()
def exit(self):
    self._window.close()
Layout

output


Source Code
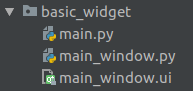
完整代碼請看:Basic Item
結論
Qt的物件因為都是繼承於QtWidget以及QtObject因此通用的屬性非常多,包括物件大小、對齊、顏色、字型等等都是一樣的用法。在開發時有不清楚的方法可以到官方document做查詢,非常方便!那我們今天就到這裡吧!
Pyside2系列教程下一篇:
[P[PyQt] PySide2 教程 #7: 表單輸入物件, ComboBox, RaidoButton, CheckButton, SpinBox