

引言
写这篇文章的目的在于很久之前的一个想法,将自己所学到的东西定期整理发布,以此来检测自己是否真正地掌握了这些知识。“一个月的时间内,自己做一个Telegram Bot”是CS布置给我的第一个Project,在当时根本没有任何编程经验的我的眼里完成这项Project无异于天方夜谭,而对于编程术语的不了解以及基础的缺失也使得我在网络上搜索信息时十分低效。我想把我初期对搭建Bot的原理的一些理解整理下来,更多地是想把这篇教程写给后来的Juniors们,让新进CS系的学弟学妹们至少有文章和前人的经验可以参考。
因为我做Bot的主要目的是为了完成教授布置的任务,所以无论是对于Python语言还是Telepot也好,始终如一的只是“能实现功能就行”这一宗旨,对于其背后的原理则是不求甚解。
同时也欢迎读者对文中涉及的不完整或是有错误的部分进行指出,或是认为有需要加上的部分而我忽略了也可以告诉我,或是参与共同编辑本文。
什么是Telegram Bot?


Telegram是俄罗斯企业家 Pavel Durov 建立的开源的,非盈利性的,以云端为基础的轻量级即时通讯软件。Telegram支持Android, iOS, Windows Phone, macOS 以及 Linux 等平台的的客户端,而它最令人瞩目的特点是极其严格的用户隐私安全条款以及信息加密功能(Telegram于2015年被中国大陆屏蔽)。
Telegram Bot是基于Telegram客户端的第三方程序。用户可以通过向Bot发送信息、照片、指令、在线请求等一系列的方式于Bot互动。Bot的所有者通过Bot 的API(Application Programming Interface)访问并请求Telegram Server的信息。可以将Bot理解为一个更加智能的可以接受指令并可以爬取网络信息的微信公众号(或者类比于UI设计没那么好的微信小程序)。
Telegram可以实现诸多实用的功能,包括但不限于:
- 获取个性化的新闻
- 与其它服务结合(收发Gmail邮件,获取Facebook推送, 接受微信消息, 下载 Youtube视频)
- 创建在线的商店,发布售卖的物品并进行在线支付
- 创建多人游戏(狼人Bot,阿瓦隆Bot)

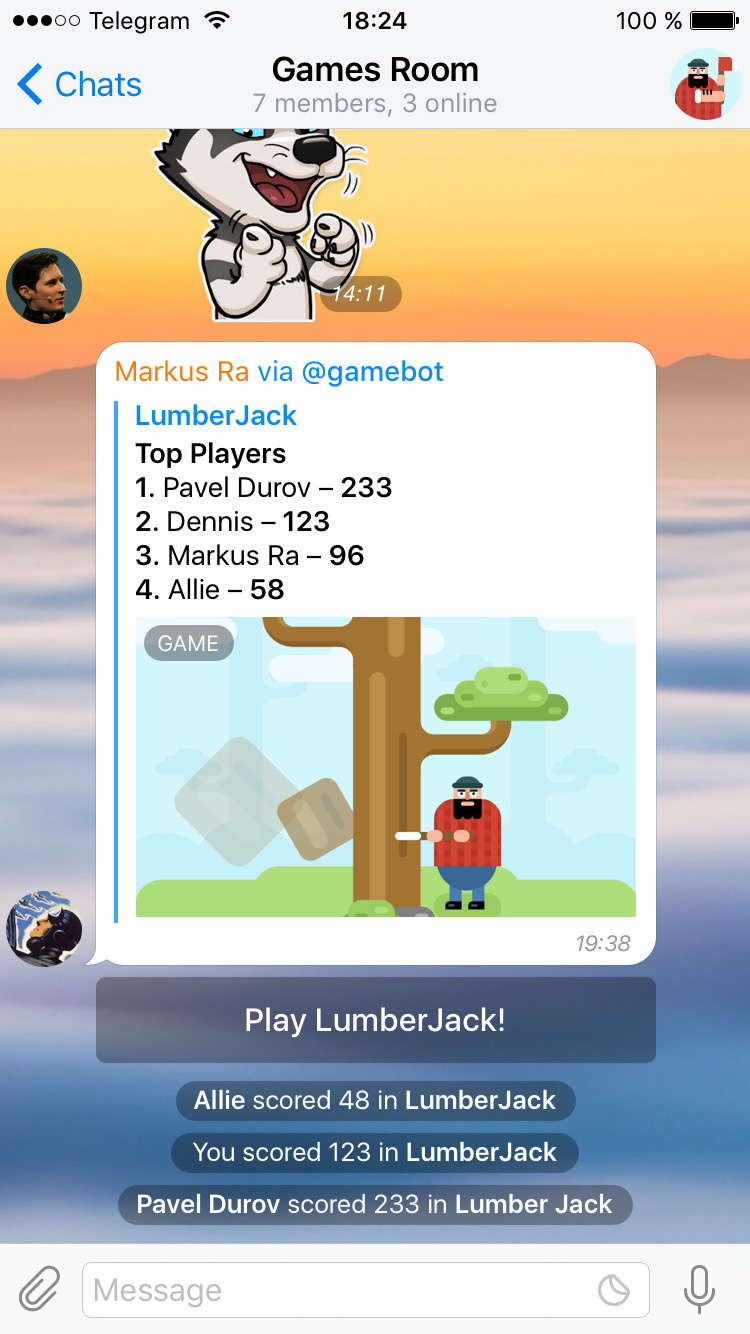
(视频为一个通过Telegram Bot实现的支付功能)
Bot API
为什么本地的Python文件可以影响到云端的Telegram Server??——来自一个不知道什么是API的蠢蠢的萌新。
这个问题我曾经想了整整一天,翻了十几篇网络上的文章(很多科技博客都直接默认你知道什么是API以及怎么用API了),总结出了这样的一个图表:

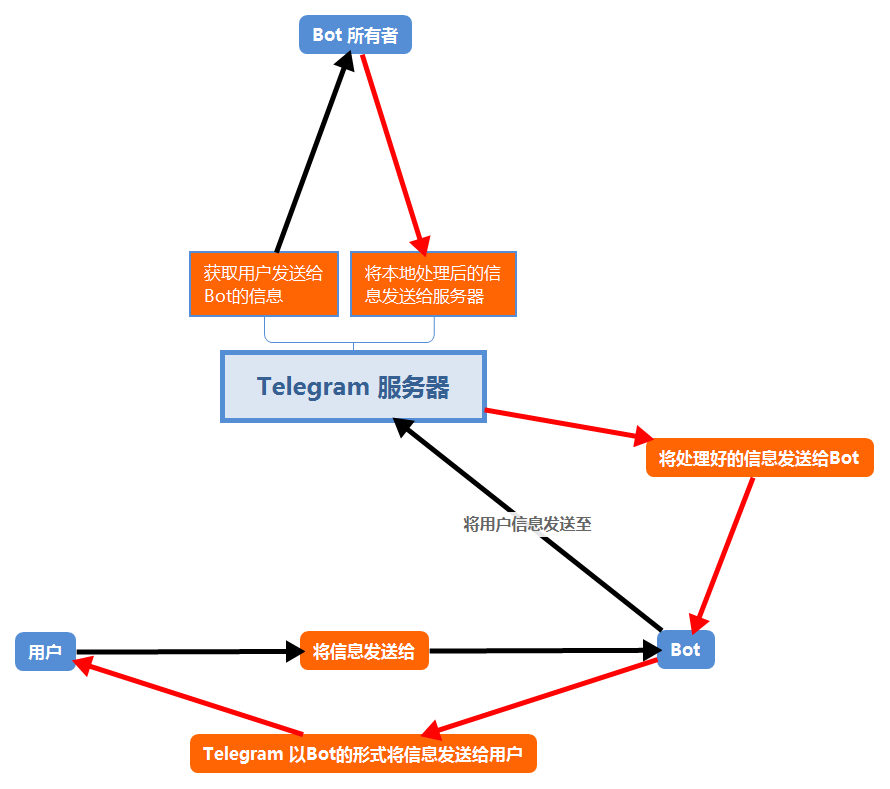
Telegram的API接口形式是URL,它和我们平常使用的网址是类似的,我们获取网站的本质是将作为网址的URL当作一个请求,发送到储存了我们所请求的站点的服务器,下载此网站的网页文件、图片文件等等。
类似的,Telegram规定了一个统一的API地址,Bot的所有者通过指定访问的Bot Token来获取于Token对应的用户信息(Bot Token是在申请Bot的时候获取的一串独特的字符串,开发者通过此字符串访问Bot)。
你可以在注册Bot(注册Bot的详细步骤在下文的准备环节)后将以下的URL复制在浏览器的网址栏中,并将”””Your Token”””替换为你获取的Token:
https://api.telegram.org/bot'''Your Token'''/getupdates向你的bot发送一条消息之后,在地址栏敲入回车,你会得到以下Message:
{'chat': {'first_name': 'Jean',
          'id': 24601,
          'last_name': 'Valjean',
          'type': 'private',
          'username': 'MonsierMadeleine'},
 'date': 17691833,
 'from': {'first_name': 'Jean',
          'id': 24601,
          'is_bot': False,
          'last_name': 'Valjean',
          'username': 'MonsierMadeleine'},
 'message_id': 7417,
 'text': 'I am warning you Javert'}
在Telegram中,message以 json ( javascript object notation)的形式被包装和发送,它的本质是nested dictionary,也就是dictionary包了一层dictionary。在之后我们将用json作为我们储存数据的形式。
同样的,如果你在地址栏中键入如下URL:
https://api.telegram.org/bot'''Your Token'''/sendMessage?chat_id="Some Chat id"&text="Hello"并将你的Token和你想要发送消息的人的chat ID,你的Bot就会将”Hello“发送给指定用户。
形式类似地,Telegram规定了很多功能,比如sendMessage, sendPhoto等,但我们不会用每次在地址栏中键入指令如此繁琐的方式来控制我们的Bot,instead 我们将通过一个功能强大的名为”Telepot“的python package 来制作Bot。
OK做完了一个差不多的简介,下面我们正式开始教程部分。
准备
此Section将不涉及编程部分而将做好编程前的准备。
- 安装Python (省略)
安装Python是我们万里长征的第一步,在Python官网选取与自己电脑位数相符的安装包,并且尽量使用更新的版本。新的版本中自带的功能将省去我们很多功夫。
2.安装并更新pip (一个小幽默 pip is a recursive acronym that can stand for either “Pip Installs Packages” or “Pip Installs Python”)软件包管理系统。
python 2.7版本之后已经自带了pip,如果你确定你的python版本是高于2.7的话可以跳过这里直接阅读安装 “telepot” package的部分,如果不成功请返回这一部分尝试更新pip。
更新pip
在 macOS 或Linux下在控制台执行以下指令:
在windows系统下,需要先用控制台进入python的文件夹,再进入安装有pip的文件夹”Scripts”
如果你不记得你在哪个地址安装了python,可以在python shell中通过以下语句获取python的安装地址:
然后在command中进入pip的安装地址后
cd "Your python directory"\\Scripts再执行更新pip的指令:
python -m pip install -U pip之后,pip的更新就完成了。
3.安装 telepot package
什么是 Telepot ?
Telepot 是由 Nike Lee (github ID nickoala)开发的整合所有了telegram API并方便开发者使用的python packge,通过安装 telepot我们可以直接在python中使用telegram API的功能。相似的package 还有python-telegram-bot, 在这里我们只使用telepot进行讲解。
如何安装telepot
通过命令行进入安装了pip的文件夹后,再在命令行中键入如下指令:

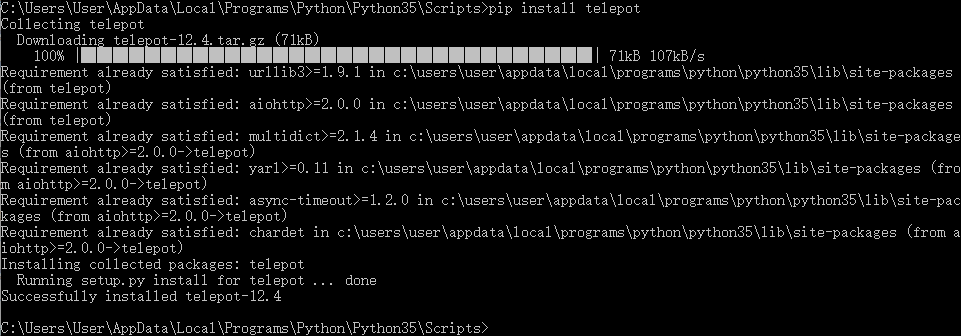
如果安装失败请返回上文检查自己哪一步有缺失(摊手
4.安装一个本地Python IDLE(Optional)
我自己在使用的IDLE是Pycharm,当然你应该使用自己最熟悉的那个。
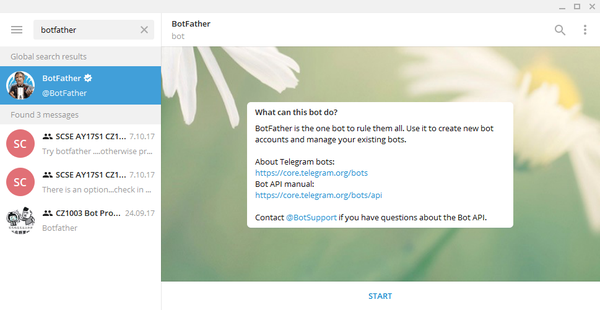
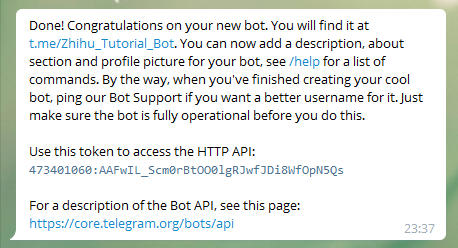
5.向Bot Father 申请一个bot token
这是所有开发者的必经之路,此仪式的目的在于获取telegram的授权以及一个独特的bot token,此token将在下文的编程的环节再次发挥作用。
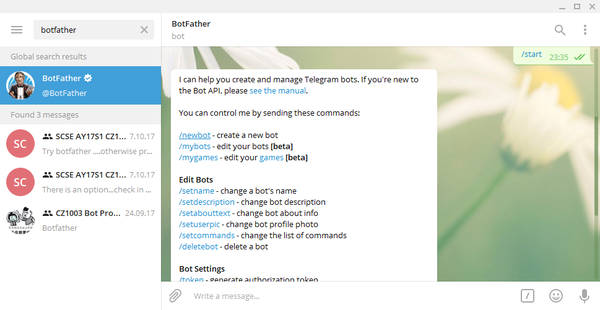
首先在telegram中搜索 botfather,并和botfather开始对话:

按下”/start”之后,botfather会回复如下信息:

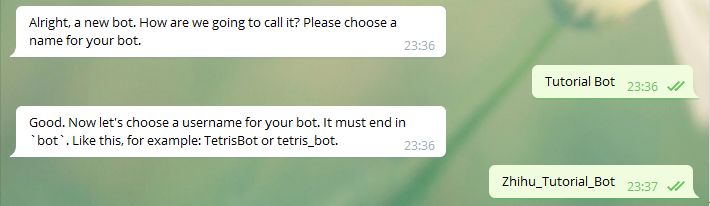
紧接着回复”/newbot”开始创建你的bot,botfather会要求你输入bot的名字和bot用户名,bot名会显示在搜索界面,而bot的username在搜索bot和添加bot入group的时候会起作用(你无法通过搜索bot名来添加bot如群组)。username必须以bot或者_bot(不区分大小写)结尾:如ABCBot,ABC_bot。

完成了这两项后,botfather会给你bot专属的token:

至此我们完成了所有编程环节之前的准备环节。
准备(Continued)
当然最最基础的教程也不能一点编程水平也不要求,对于一个新手来说,网上的资源和教程多得让人眼花缭乱,不知道哪一个适合自己,尤其适合在短时间内学习基本的python syntax以达到可以进行bot编程的程度。
基于我的个人体验,在一个月的时间内,抱着大部头书啃是非常不现实的。厚厚的教程书虽然讲解得很全很细致,但是你并没有那么多时间抱着它慢慢研读,同样不推荐的还有中文教程,理由是你将在所有在中文教程中学到的术语都需要你自己再从中文翻译成英文,相当于增加了学习成本(因为Ultimately你还是要用英文来进行编程和学习编程的)
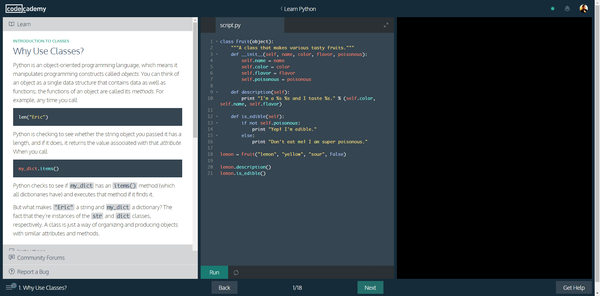
在这里我推荐一个网站’Codeacademy’,这个免费的在线编程学习网站的特点在于integrate了一款网页版的在线IDLE以及详尽但难度不高的测验以帮助你巩固学到的知识点,你可以在IDLE中测试你的代码并且在右侧的反馈栏中看到自己code的error出现在哪里。’Learn Python’这一整个Module慢的话一个星期,快的话三到四天就可以全部完成,以达到掌握最基本python syntax的目的。
编程篇
目录
- 搭建基础
- 处理信息
- 处理连续对话
- 储存数据
1.搭建基础
1.1 测试你的bot账户
你可以在python中输入如下语句来获取你的bot信息:
>>> import telepot #将telepot这个模组导入到Python中来
>>> bot = telepot.Bot('***** Your Token *****') #将bot这个在程序中使用的variable和你的bot token联系起来,在之后的程序中,每当要命令bot的时候可以直接call bot的instance
>>> bot.getMe() #getMe()是一个获取bot信息的function
{'first_name': 'Jean', 'username': 'MonsieurMadeleine', 'id': 24601} #在这里你的bot的信息将以一个dictionary的形式被print出来
1.2 接收消息
设计上,telegram bot是无法主动向用户发送消息的(主要的目的是防止spam),所以你需要主动地通过指令以获取用户的信息:
>>> from pprint import pprint
>>> response = bot.getUpdates()
>>> pprint(response)
[{'message': {'chat': {'first_name': 'Jean',
                       'id': 24601,
                       'type': 'private'},
              'date': 1564897562,
              'from': {'first_name': 'Jean', 'id': 24601},
              'message_id': 104152,
              'text': 'I'm a stronger man by far!'},
  'update_id': 100000000}]
pprint 指pretty print,是python自带的一个可以让打印出来的dictionary更美观的一个function
getUpdates()是telegram中获取Update的方法,依据Telegram API,getUpdate会return一个以Update object组成的array。在python中,Update object是以dictionary的形式被表现出来的。
每当有用户向你的bot发送一条消息/图片/指令的时候,你都可以通过getUpdate()的方式来获取这条消息。在这条消息中,message 的key包括chat(用户的名字,ID和聊天的种类(在telegram中,聊天的种类分为三种,private, group以及channel,我们更多地是handle private的信息)),date(消息发送的日期),from(发送者的信息),message_id(一个独特的,message_id可以specify某一条信息),而text就是用户所发送消息的文本。
但是每次都使用getUpdate()来获取消息就太麻烦了,这意味着你需要连续不断地敲击运行按钮才能获取新用户发送给bot的消息,在这里telepot提供了一个非常方便的解决办法,我们将详细讲解。
1.3 持续地接受消息
在telepot中,MessageLoop是一个非常方便的处理信息的方式,如下:
>>> from telepot.loop import MessageLoop #导入MessageLoop
>>> def handle(msg): #在这里定义handle来告诉MessageLoop应该如何处理Message
...     pprint(msg)  #simply print message
...
>>> MessageLoop(bot, handle).run_as_thread()
MessageLoop需要两个argument,一个是你已经specify token的’bot’,而另一个就是告诉MessageLoop如何处理信息的’method’(在这里我们将它命名为handle,你可以将此method改成任意名字,只要在定义的时候,method只接收一个argument,那就是’msg’)。
‘run_as_thread’在这里起到了,只要你启动了你的python file,那么这个MessageLoop就会永续不断地运行下去,除非遇到特殊情况(冲突或者恶性bug等等)
1.4 快速的Glance Message
telegram中的message作为一个json object,其中包含很多重要的而且可能会在一次Bot与用户的交互中多次使用的信息,而每次通过message对应的key来访问这些信息实在是有够麻烦,对此telepot提供了glance这一功能来快速获取message中的某些重要信息。
content_type, chat_type, chat_id = telepot.glance(msg)在这条语句之后,telepot帮你快速查看了msg中的content type, chat type和chat id并且储存在了这三个variable中,在之后的代码里可以直接通过这些variable来访问相对应的信息。
Tip:glance的功能不限于只获取这三种信息(content type, chat type和chat id)而是所有在message中存在的legal key中的信息都可以获取。
1.5 向用户发送信息
在telepot中,向用户发送信息这一功能是通过bot.sendMessage() 这一function实现的,sendMessage() take in 两个arguments,一个是你希望发送的用户的chat_id,另一个是你希望发送消息的文本。
bot.sendMessage(chat_id, text)到这里你已经掌握了搭建一个bot的所有基本操作,让我们来尝试做一个非常简单的bot吧。
import time
import telepot
from telepot.loop import MessageLoop

def handle(msg):
    content_type, chat_type, chat_id = telepot.glance(msg)
    print(content_type, chat_type, chat_id)

    if content_type == 'text':
        bot.sendMessage(chat_id, msg['text'])

TOKEN = 'your token'

bot = telepot.Bot(TOKEN)
MessageLoop(bot, handle).run_as_thread()
print ('Listening ...')

# Keep the program running.
while 1:
    time.sleep(10)
Let’s breakdown the code:
import time
import telepot
from telepot.loop import MessageLoop
在这里我们导入了我们需要的package和function。
def handle(msg):
    content_type, chat_type, chat_id = telepot.glance(msg)
    print(content_type, chat_type, chat_id)

    if content_type == 'text':
        bot.sendMessage(chat_id, msg['text'])
我们创建了handle这个funtion来定义bot如何处理信息的方法。通过使用telepot.glance()我们获取了用户向bot发送的信息的content_type, chat_type以及chat_id,我们将这些信息print在console中,并且如果用户发送的信息是文本的话,我们会把这一段文本复制下来并且发送给用户。
2.处理对话
2.1 向你的bot添加指令
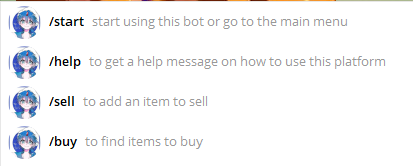

有的时候你可能会在使用其他人开发的bot的时候注意到按下‘/’键后,会弹出一系列的指令来帮助你快速地使用bot的某些功能。指令的本质是以/为开头的文本,如何让bot分析指令并且act correspondingly呢?
2.1.1设置指令
你需要通过bot father来为你的bot设置你希望你的bot所拥有的指令:
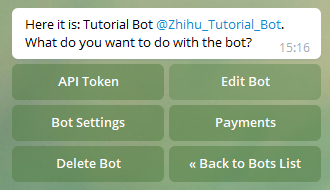

在bot father中选中你的bot,然后单机Edit Bot:

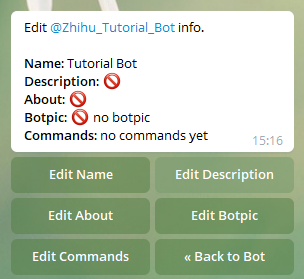
选择Edit Commands:
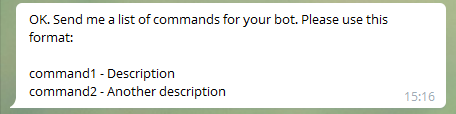

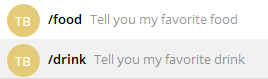
到这一步之后,botfather会让你告诉它指令的列表。值得注意的是指令是有固定格式的,例如:
food - food - Tell you my favorite food
drink - Tell you my favorite drink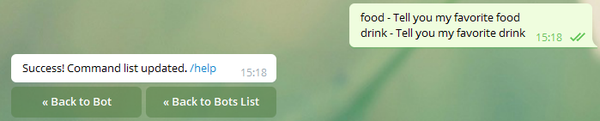
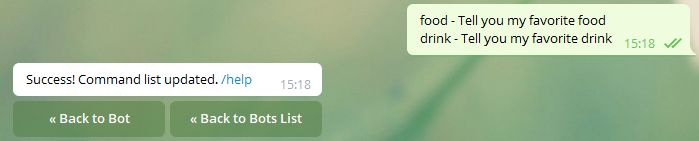
之后在你自己的bot界面输入’/’,你就会看到你刚才设置的指令列表。你随时可以更改你的指令:

但是到这里你会发现,单单是设置你的指令并不会对你的bot造成任何影响,如果你没有在程序中设置你的bot该如何回应这个指令的话,你的bot并不会对指令有任何的回应。下面我们将用一个简单的例子讲解如何使你的bot做到回应指令。
2.1.2 简单回应指令
首先我们要注意的是,指令只是一个以’/’开头的字符串,它在message中位于key ‘text’中,所以分析指令的方式就是检测指令的内容,然后做出相应的回应。
import time
import telepot
from telepot.loop import MessageLoop

def handle(msg):
    content_type, chat_type, chat_id = telepot.glance(msg)
    print(content_type, chat_type, chat_id)

    if msg['text'] == '/food':
        bot.sendMessage(chat_id, 'hamburger')
    elif msg['text'] == '/drink':
        bot.sendMessage(chat_id, 'coke zero')

TOKEN = 'Your Token'

bot = telepot.Bot(TOKEN)
MessageLoop(bot, handle).run_as_thread()
print ('Listening ...')

# Keep the program running.
while 1:
    time.sleep(10)
运行的结果是这样的:
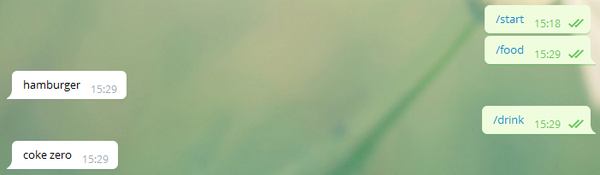

在这里我们通过使用一个 if 语句来检测msg的内容,然后做出相应的回应。这是一个非常简单的例子,目的只是为了了解如何分析指令,当然你肯定不会希望你的bot只会发hamburger或者coke zero的,你可以通过增加其它语句来实现更复杂的功能。
2.2 个性化键盘和指令键盘(custom keyboard & inline keyboard)
telegram bot的一大特性就在于,bot会根据用户的请求以及分析对话进行到哪一步来提供给用户相应的键盘来方便用户输入:


Customer keyboard 和 inline keyboard有以下几点区别:
1.inline keyboard 出现在输入区之上,而custom keyboard出现在键盘输入区之下;
2.按下inline keyboard 会返回给bot一个callback query,而按下custom keyboard只后只会给bot发送一条文本信息,本质和同为文本的command是一样的。
下面我们分别讲解如何向bot发送inline keyboard 和custom keyboard:
2.2.1 custom keyboard
import time
import telepot
from telepot.loop import MessageLoop
from telepot.namedtuple import ReplyKeyboardMarkup
def on_chat_message(msg):
content_type, chat_type, chat_id = telepot.glance(msg)
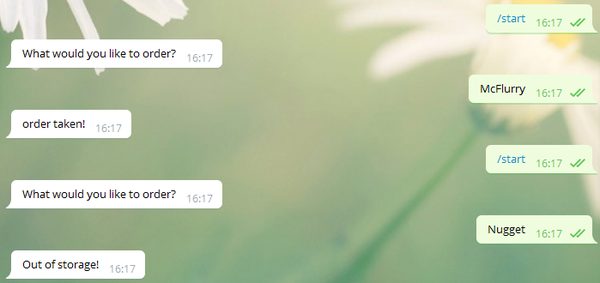
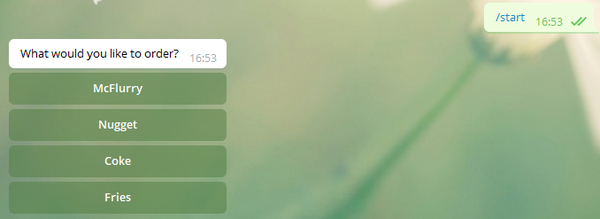
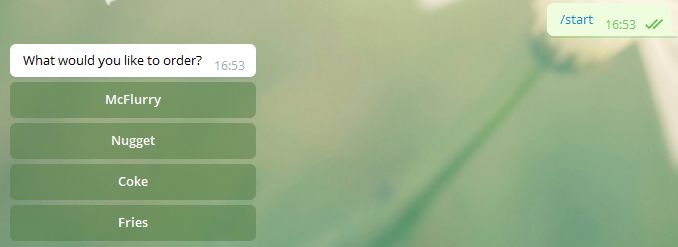
if msg['text'] == '/start':
mark_up = ReplyKeyboardMarkup(keyboard=[['McFlurry'],['Nugget'],['Coke'],['Fries']], one_time_keyboard=True)
bot.sendMessage(chat_id, text='What would you like to order?', reply_markup=mark_up)
elif msg['text'] == 'Nugget':
bot.sendMessage(chat_id, 'Out of storage!')
else:
bot.sendMessage(chat_id, 'order taken!')
TOKEN = 'Your Token'
bot = telepot.Bot(TOKEN)
MessageLoop(bot, on_chat_message).run_as_thread()
print('Listening ...')
while 1:
time.sleep(10)breaking-down:
from telepot.namedtuple import ReplyKeyboardMarkup # import things we need在发送keyboard之前毫无疑问需要进行一些设置,包括你希望你的keyboard有几个按钮,按一次就消失或者一直会出现在那里等等。进行这些设置的方法是使用replymarkup:
mark_up = ReplyKeyboardMarkup(keyboard=[['McFlurry'],['Nugget'],['Coke'],['Fries']], one_time_keyboard=True)在ReplyKeyboardMarkup中的keyboard部分,键盘的按钮是以array的形式被定义的,每一个array element的文本将会出现在keyboard的按钮之上。
而分析custom keyboard的方法和分析command的方法一样,通过if statement来实现。
上文的代码的demo如下:

在开发我们自己的bot的时候,我们写过一个方便发送custom keyboard的function:
def send_list_keyboard(self, chat_id, text_info, lst):
        kb = []
        kb_2 = []
        for item in lst:
            kb.append(item)
            kb_2.append(kb)
            kb = []
        mark_up = ReplyKeyboardMarkup(keyboard=kb_2, one_time_keyboard = True)
        bot.sendMessage(chat_id, text=text_info, reply_markup=mark_up)
看上去非常的tedious2333但是当时works fine lah。因为写function的时候也没有学过array,只是单纯地把它当作了list套list。
可以以以下方法使用:
menu = ['Nugget','McFlurry','Coke','Fries']
send_list_keyboard(chat_id, text_info, menu)
2.2.1 inline keyboard
inline keyboard和custom在使用的形式上略显不同:
import time
import telepot
from telepot.loop import MessageLoop
from telepot.namedtuple import InlineKeyboardMarkup, InlineKeyboardButton
def on_chat_message(msg):
content_type, chat_type, chat_id = telepot.glance(msg)
keyboard = InlineKeyboardMarkup(inline_keyboard=[
[InlineKeyboardButton(text='McFlurry', callback_data='McFlurry')],
[InlineKeyboardButton(text='Nugget', callback_data='Nugget')],
[InlineKeyboardButton(text='Coke', callback_data='Coke')],
[InlineKeyboardButton(text='Coke', callback_data='Coke')],
])
bot.sendMessage(chat_id, 'What would you like to order?', reply_markup=keyboard)
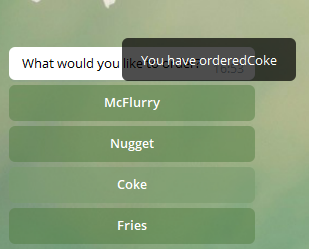
def on_callback_query(msg):
query_id, from_id, query_data = telepot.glance(msg, flavor='callback_query')
bot.answerCallbackQuery(query_id, text='Sold out!')
bot.answerCallbackQuery(query_id, text='You have ordered'+query_data)
TOKEN = 'Your Token'
bot = telepot.Bot(TOKEN)
MessageLoop(bot, {'chat': on_chat_message,
'callback_query': on_callback_query}).run_as_thread()
print('Listening ...')
while 1:
time.sleep(10)首先keyboard markup 要变更为InlineKeyboardMarkup,其次inline keyboard的每一个button需要两个数据,一个是显示的按钮文字,另一个是按下按钮后它会返回的query data(文本)
第二个区别在于 on_callback_query中,chat_id变为了from_id(虽然二者在内容上是相同的),quary_data即是用户按下keyboard的按钮之后会返回的data信息。
代码的demo如下:
在我按下Coke按钮之后会返回一个提示:

同样的有一个方便的function来发送inline keyboard:
def send_custom_inline_keyboard(self, chat_id, text_info, send_tuple_list):
    kb = []
    for t in send_tuple_list:
        kb.append([InlineKeyboardButton(text=t[0], callback_data=t[1])])
    mark_up = InlineKeyboardMarkup(inline_keyboard=kb)
    bot.sendMessage(chat_id, text=text_info, reply_markup=mark_up, parse_mode='Markdown')

menu = [('McFlurry', 'McFlurry'), ('Nugget', 'Nugget'), ('Coke', 'Coke'),('Fries','Fries')]
send_custom_inline_keyboard(chat_id, text_info, menu):
3.处理连续对话
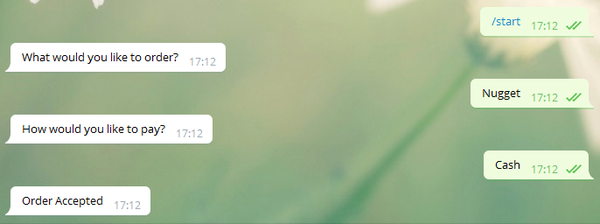
到目前为止我们和bot所实现的所有交互都基于同一个模式——ask & answer 然后结束,但是对于想要实现更多功能的bot来说,一定会需要与用户进行多次连续的交互对话。在telepot中实现与用户连续对话的方式是使用DelegatorBot:
import time
import telepot
from telepot.loop import MessageLoop
from telepot.delegate import pave_event_space, per_chat_id, create_open
from telepot.namedtuple import ReplyKeyboardMarkup

class GoldenArches(telepot.helper.ChatHandler):
    def __init__(self, *args, **kwargs):
        super(GoldenArches, self).__init__(*args, **kwargs)
        self.indicator = 'choose_order'

    def on_chat_message(self, msg):
        content_type, chat_type, chat_id = telepot.glance(msg)
        if self.indicator == 'choose_order':
            mark_up = ReplyKeyboardMarkup(keyboard=[['McFlurry'], ['Nugget'], ['Coke'], ['Fries']],
                                          one_time_keyboard=True)
            bot.sendMessage(chat_id, text='What would you like to order?', reply_markup=mark_up)
            self.indicator = 'choose_payment'
        elif self.indicator == 'choose_payment':
            mark_up = ReplyKeyboardMarkup(keyboard=[['Cash'], ['CeditCard']],
                                          one_time_keyboard=True)
            bot.sendMessage(chat_id, text='How would you like to pay?', reply_markup=mark_up)
            self.indicator = 'set_order'
        elif self.indicator == 'set_order':
            bot.sendMessage(chat_id, 'Order Accepted')


TOKEN = 'Your Token'

bot = telepot.DelegatorBot(TOKEN, [
    pave_event_space()(
        per_chat_id(), create_open, GoldenArches, timeout=10),
])
MessageLoop(bot).run_as_thread()

while 1:
    time.sleep(10)
Let’s breakdown that!
class GoldenArches(telepot.helper.ChatHandler):在这里我们将bot的所有功能定义在同一个Class中,此class继承自 telepot.helper.ChatHandler (关于class的知识可以从codeacademy中学习)。
def __init__(self, *args, **kwargs):
    super(GoldenArches, self).__init__(*args, **kwargs)
    self.indicator = 'choose_order'
在class的initialization中,我们定义了一个变量’indicator’用来指示每一次用户发送的message在bot的算法中应该处于哪一环,以及如何处理这条信息。
def on_chat_message(self, msg):
    content_type, chat_type, chat_id = telepot.glance(msg)
    if self.indicator == 'choose_order':
        mark_up = ReplyKeyboardMarkup(keyboard=[['McFlurry'], ['Nugget'], ['Coke'], ['Fries']],
                                      one_time_keyboard=True)
        bot.sendMessage(chat_id, text='What would you like to order?', reply_markup=mark_up)
        self.indicator = 'choose_payment'
    elif self.indicator == 'choose_payment':
        mark_up = ReplyKeyboardMarkup(keyboard=[['Cash'], ['CeditCard']],
                                     one_time_keyboard=True)
        bot.sendMessage(chat_id, text='How would you like to pay?', reply_markup=mark_up)
        self.indicator = 'set_order'
    elif self.indicator == 'set_order':
        bot.sendMessage(chat_id, 'Order Accepted')
每当bot接收到消息的时候,它会先检测这条message的indicator是什么,然后把它交付对应的if下的语句处理,处理结束后,将message的indicator更改为下一步的indicator,然后继续进行与用户的对话。
本段代码的demo如下:
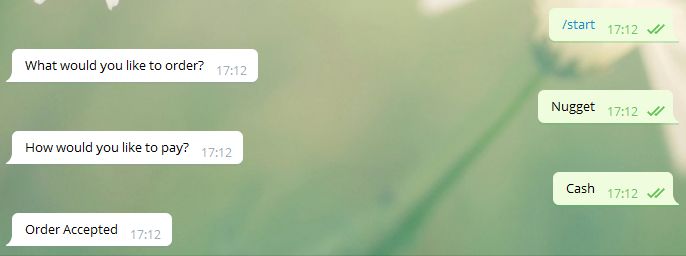
4.储存数据
万里长征只剩最后一步了!
储存用户输入的数据的最简单的方法是将数据储存在json文件中:
import time
import telepot
import json
from telepot.loop import MessageLoop
from telepot.delegate import pave_event_space, per_chat_id, create_open
from telepot.namedtuple import ReplyKeyboardMarkup

class GoldenArches(telepot.helper.ChatHandler):
    def __init__(self, *args, **kwargs):
        super(GoldenArches, self).__init__(*args, **kwargs)
        self.indicator = 'choose_order'
        self.order = {}

    def on_chat_message(self, msg):
        content_type, chat_type, chat_id = telepot.glance(msg)
        if self.indicator == 'choose_order':
            mark_up = ReplyKeyboardMarkup(keyboard=[['McFlurry'], ['Nugget'], ['Coke'], ['Fries']],
                                          one_time_keyboard=True)
            bot.sendMessage(chat_id, text='What would you like to order?', reply_markup=mark_up)
            self.indicator = 'choose_payment'
        elif self.indicator == 'choose_payment':
            self.order['order'] = msg['text']
            mark_up = ReplyKeyboardMarkup(keyboard=[['Cash'], ['CeditCard']],
                                          one_time_keyboard=True)
            bot.sendMessage(chat_id, text='How would you like to pay?', reply_markup=mark_up)
            self.indicator = 'set_order'
        elif self.indicator == 'set_order':
            self.order['payment'] = msg['text']
            with open('order.json', 'a') as handle:
                json.dump(self.order, handle)
                handle.write("\n")
                handle.close()
            bot.sendMessage(chat_id, 'Order Accepted')


TOKEN = '473401060:AAFwIL_Scm0rBtOO0lgRJwfJDi8WfOpN5Qs'

bot = telepot.DelegatorBot(TOKEN, [
    pave_event_space()(
        per_chat_id(), create_open, GoldenArches, timeout=10),
])
MessageLoop(bot).run_as_thread()

while 1:
    time.sleep(10)
我们对上一个section的代码进行了一些微小的操作:
   def __init__(self, *args, **kwargs):
        super(GoldenArches, self).__init__(*args, **kwargs)
        self.indicator = 'choose_order'
        self.order = {}
首先我们在initialization里创建了一个名为order的空dictionary以储存用户的order信息。
if self.indicator == 'choose_order':
            mark_up = ReplyKeyboardMarkup(keyboard=[['McFlurry'], ['Nugget'], ['Coke'], ['Fries']],
                                          one_time_keyboard=True)
            bot.sendMessage(chat_id, text='What would you like to order?', reply_markup=mark_up)
            self.indicator = 'choose_payment'
        elif self.indicator == 'choose_payment':
            self.order['order'] = msg['text']
            mark_up = ReplyKeyboardMarkup(keyboard=[['Cash'], ['CeditCard']],
                                          one_time_keyboard=True)
            bot.sendMessage(chat_id, text='How would you like to pay?', reply_markup=mark_up)
            self.indicator = 'set_order'
我们加入了一行语句将用户的文本数据储存在了order中:
self.order['order'] = msg['text']值得注意的是用户的回复不会和keyboard发送语句处于同一if下,而是应该处于下一步的if 中。
with open('order.json', 'a') as handle:
    json.dump(self.order, handle)
    handle.write("\n")
    handle.close()
在储存好数据之后,我们将数据写入一个名为order.json的文件。
紧接着,order就以一个dictionary的形式被储存起来了:
{'order': Nugget, 'payment': Cash}之后如果需要导入数据,则可以使用以下语句将dictionary导入到一个list中:
with open('order.json', 'r') as handle:
    user_sale_data = [json.loads(line) for line in handle]
最后
Anyway if someone reads it’s good, if not then let this be my legacy。和日记的性质是类似的,我们并不因为单纯的存在而在这个世界上留下痕迹,而记录我们曾经做过的事情的图片和文字mark it。我的想法依然是记录自己做过的学过的事情 and make it unique。
附上我的参考网站: